February 21, 2017

PowerPro - Multipurpose Business Powerpoint Template

PowerPro - Multipurpose Business Powerpoint Template is a professional collection of graphic, slides, diagram, template, etc. to build your own great presentation, you can get over 450 unique slides that you can use it for various business and presentation purpose such Language Course, Cleaning Services, Medical Services, Automotive Dealer, Band & Musician Profile, Construction Services, Diving Course, Fashion, Photography Services, travel agency, creative agency, technology startup, cafe & restaurant, barbershop, app demo, fitness, and many more. Everything you’ll need for presentation is available on this templates!. Let's make a great impression from your audience! and make your sucessful presentation by using this template!

PowerPro - Multipurpose Business Powerpoint Template

15 Business Category Template Including:

  • Language Course Slides
  • Cleaning Services Slides
  • Medical Services Slides
  • Automotive Dealer Slides
  • Band & Musician Profile Slides
  • Construction Services Slides
  • Diving Course Slides
  • Fashion Slides
  • Photography Services Slides
  • Travel Agency Slides
  • New Update Cafe & Restaurant Slides
  • New Update Barbershop Slides
  • New Update Startup Pithdeck Slides
  • New Update Fitness Slides
  • New Update App Demo Slides

Features:

  • 500+ Unique Creative Slides
  • 1200+ Vector Icon
  • 15 Business Category Template
  • Smart and Innovative Presentation Slides
  • Easy Editable charts via excel
  • Modern layouts Based on Master Slides
  • Used and recommended free web fonts
  • Vector icons 100% Fully Editable
  • PPTX and PPT Files
  • 20 Premade colors
  • Just One Click to change the color and auto recolored
  • All Graphic Resizable and Editable
  • Aspect Ratio 16:9

What’s included:

  • PPTX file for Microsoft Office Powerpoint 2007/2010/2013
  • PPT file for Microsoft Office Powerpoint 1997/2003
  • HELP file
  • XML Colors Themes

Updates

Version 1.1 – 21 Feb 2017
  - Add 5 new business category
For support or if you are looking for custom Powerpoint design or any other services you may need, contact me at: okiprasastio(at)gmail.com


Download Now

Posted on Tuesday, February 21, 2017 by Oki Prasastio

No comments

July 2, 2014

A Freebie from smashing magazine , we think this is good for you web designer who search for icon which fit at your website , because this is vector icons , so you can resize it whatever you want , the design look amazing too , with flat and clean design make it more fantastic! a good icons.
Download and Read More Here


Tag: Creative Web Development , design graphic company , php development indonesia , suave digital , web development , web development bandung , web development indonesia , Php developer indonesia , php developer bandung indonesia , php developer cimahi indonesia , web development indonesia , web design indonesia , web design cimahi , web development cimahi , web development and graphic design company ,

Posted on Wednesday, July 02, 2014 by Oki Prasastio

1 comment

March 2, 2014

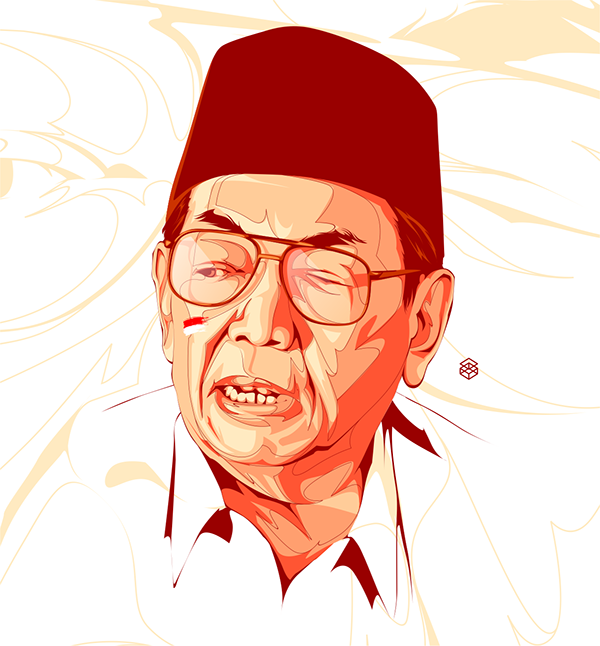
Here we show you , some of my friend's illustration art , maybe this can be your inspiration for create art like this too.
and the people who illustrated in here is the some of Indonesian Republic presidents.


Bacharuddin Jusuf Habibie (1998-1999)

BJ Habibie, tracing, illustration

Detail

BJ Habibie, tracing, illustration


Abdurrahman Wahid(1999 - 2001)

Abdurrahman Wahid , Tracing , Illustration

Detail

Abdurrahman Wahid, Tracing, Illustration


Megawati Soekarnoputri (2001 - 2004)

Megawati Soekarnoputri, Tracing, Illustration

Detail

Megawati Soekarnoputri, Tracing, Illustration


Soeharto (1967-1998)

Soeharto, Tracing, illustration


Detail

Soeharto, Tracing, Illustration


Behance

See another Art of Indri Solihin Here

Posted BySuavedigital

Posted on Sunday, March 02, 2014 by Oki Prasastio

2 comments

February 23, 2014


Hi, Here i want to explain you about jquery append that i modify to use with form , i create the function where you can create the form and in the form there is a text field and textarea and surelly submit button,

and what the difference ? , the normally form will bring you to another page or reload the page when the form is submitted , but with this function you can temporary save your textfield and textarea without move to another page or reload the page

How it's work ? Here i give you the main codes


HTML

<div class="container"> 
  <table>
   <tbody id="tablebody">
    <tr>
     <td class="content">
      <div class="AppendedContainer"> <!-- Appended content will be in here--> </div>
      <div class="form">
       <div class="title">Title</div>
       <input type="text" class="input-text">
       <div class="content">Content</div>
       <textarea class="input-textarea"></textarea>
       <div class="a">
        <button type="button" class="add-button" href="javascript:void(0)" id="add">Add</button>
        <button type="button" class="remove-button" href="javascript:void(0)" id="remove">Clear</button> 
       </div>
      </div>
     </td>
    </tr>
   </tbody>
  </table>
 </div>

in here there is the form inside the table and div , inside the form there is textfield , textarea , and surely submit and clear button , and when you input some text in textfield and textarea and submit it , the page still reload right ?, and then add this javascript to bottom of your page

JavaScript

<script src="http://code.jquery.com/jquery-1.7.2.js"></script>
 <script type="text/javascript">

 var i = 1;
 var inpt = $('.input-text').val();
 var text = $('.input-textarea').val();


 $('#add').click(function() {

  if ( $('.input-text').val() == '' ){
   alert('The field is empty');
  }
  else {
   if (i > 5 ) {
    alert('You just can input 5 Contents');
   }
   else {

    $('.AppendedContainer').append('<div class="AppendedContent"><div class="title">' + $('.input-text').val() + '</div> <div class="text">' + $('.input-textarea').val() + '</div></div>');

    $('.input-text').val('');
    $('.input-textarea').val('');

    i++;
    return false;
   } 
  }
 });

 $(document).on('click', '#remove' , function() {
  $('.AppendedContent' ).remove();
  $i=0;
  return false;
 });

 </script>


now try to input some data in textfield and textarea and submit it, Yes! the page not reloaded now and the data saved and displayed temporary to the page , now leave the textfield and textarea empty and then click submit again , oops you cannot leave it empty , try again to submit data more than 5 data , what the effect ? yes you cannot submit more than 5 data

how it's can happen ?

Ok , i will explain that


first, you ever read about jquery append ? , you can check this for understanding what is jquery append :https://api.jquery.com/append/

in here the .append function is to append(add) the content which you inputted to textfield and textarea to div with have class .AppendedContainer


$('.AppendedContainer').append('<div class="AppendedContent"><div class="title">' + $('.input-text').val() + '</div> <div class="text">' + $('.input-textarea').val() + '</div></div>');


the $('.input-text').val() is your textfield value and $('.input-textarea').val() is your textarea value


and why i cannot leave the textfield blank


if ( $('.input-text').val() == '' ){
alert('The field is empty');
}


here , look at the $('.input-text').val() == '' , yes if you leave the textfield empty or '' in if conditions. you will get alert('The field is empty'); message


and then why i cannot submit more than 5 data ,

in here i have limitation that limit the user for submit data , i add this to avoid spamming ,

here the code


var i = 1; is the sum of appended content , and


if (i > 6 ) {
alert('You just can input 5 Contents');
}


if the appended content or i more than 5 , it will show you the alert('You just can input 5 Contents'); message


ok , i have explain that , but if you think your form still ugly with out the style , i give you the css with my favorite style type , flat style


CSS

body {
  font-family: Helvetica, Arial, sans-serif;
  color: #34495e;
 }

 .container {
  width: 500px;
  background-color: #eff0f2;
  margin: 0 auto;
  padding: 20px;
 }

 .content .form {
  width: 480px;
 }


 .content .form input {
  border: 2px solid #bdc3c7;
  color: #34495e;
  font-size: 15px;
  padding: 8px 12px;
  -webkit-appearance: none;
  border-radius: 6px;
  -webkit-box-shadow: none;
  -moz-box-shadow: none;
  box-shadow: none;
  width: 100%;
 }

 .content .form textarea {
  border: 2px solid #bdc3c7;
  color: #34495e;
  font-size: 15px;
  padding: 8px 12px;
  -webkit-appearance: none;
  border-radius: 6px;
  -webkit-box-shadow: none;
  -moz-box-shadow: none;
  box-shadow: none;
  margin-bottom: 10px;
  width: 100%;
 }

 .content .form input:focus {
  border: 2px solid #3498DB;
  outline: none;
 }

 .content .form textarea:focus {
  border: 2px solid #3498DB;
  outline: none;
 }

 .content .form .title,.content {
  color: #6b6a63;
  font-size: 14px;
  padding-bottom: 5px;
 }

 .content .form .content {
  padding-top: 10px;
 }

 .add-button {
  position: relative;
  vertical-align: top;
  width: 100%;
  padding: 5px;
  font-size: 14px;
  text-decoration: none;
  color: #fff;
  text-align: center;
  text-shadow: 0 1px 2px rgba(0,0,0,.25);
  background: #01afd1;
  border: 0;
  border-bottom: 2px solid #0699b6;
  cursor: pointer;
  -webkit-box-shadow: inset 0 -2px #0699b6;
  box-shadow: inset 0 -2px #0699b6;
  width: 100px;
 }

 .remove-button {
  position: relative;
  vertical-align: top;
  width: 100%;
  padding: 5px;
  font-size: 14px;
  text-decoration: none;
  color: #fff;
  text-align: center;
  text-shadow: 0 1px 2px rgba(0,0,0,.25);
  background: #e74c3c;
  border: 0;
  border-bottom: 2px solid #c0392b;
  cursor: pointer;
  -webkit-box-shadow: inset 0 -2px #c0392b;
  box-shadow: inset 0 -2px #c0392b;
  width: 100px;
 }

 .add-button:active,.remove-button:active {
  top: 1px;
  outline: none;
  -webkit-box-shadow: none;
  box-shadow: none;
 }

 .AppendedContent .title{
  font-size: 14px;
  font-weight: bold;
  padding-bottom: 5px;
 }

 .AppendedContent {
  border-bottom: 1px solid  #bdc3c7;
  padding-bottom: 20px;
  margin-bottom: 20px;
 }

 .separator {
  border-bottom: 1px solid #bdc3c7;
  margin-bottom: 20px;
  margin-top: 20px;
 }


 .author {
  font-size: 12px;
  margin: 0 auto;
  margin-top: 15px;
  text-align: center;
  color: #34495e;
 }


Look at the DEMO HERE

And download for Free HERE


Created By team of SUAVEDIGITAL


Posted on Sunday, February 23, 2014 by Oki Prasastio

No comments

October 22, 2013


Hello , I want to show you my other simple project . It called jQuery Realtime Clock Flat Style.

I Create realtime clock from html and jquery and make the layout flat styled .

The main function is to display the time taken from the time on your computer with Jquery, Hours minutes and seconds will change dynamically every seconds follow the time on your computer.

Here i give you the main code , Simple and easy to use


Javascript 


HTML 


<div id="box-wrapper">
<body onload="GetClock(); setInterval('GetClock()', 1000 )">

<div class="main-wrapper">
  <div class="clock-header">
    <div class="clock-title">Time Is Money!</div>
    <div class="add-button"></div>
  </div>
  <div class="clock-wrapper">
    <div class="clock">
      <div class="hours-wrapper">
        <span id="hours"> </span>
        <div class="hours-text">HOUR</div>
      </div>
      <div class="separator">:</div>
      <div class="minutes-wrapper">
        <span id="minutes"> </span>
        <div class="hours-text">MIN</div>
      </div>
      <div class="separator">:</div>
      <div class="seconds-wrapper">
        <span id="seconds"> </span>
        <div class="hours-text">SEC</div>
      </div>
      <div class="separator2"></div>
      <div class="AMPM-wrapper">
        <span id="AMPM"> </span>
      </div>

    </div>
  </div>
</div>

CSS 


body {
 margin: 0;
 font-family: helvetica;
 background-color: #eaedf1;
}

.main-wrapper {
 margin: 0 auto;
 overflow: auto;
 width: 350px;
}

.clock-header {
 margin-top: 30px;
 background-color: #203133;
 height: 50px;
 width: 350px;
 border-top-left-radius: 3px;
 border-top-right-radius: 3px;
}

.clock-title {
 padding: 12px;
 font-size: 18px;
 color: #e3e4e6;
 font-weight: normal;
 text-align: center;
}

.clock-wrapper {
 background-color: #14b9d6;
 border-bottom-left-radius: 3px;
 border-bottom-right-radius: 3px;
 padding-bottom: 10px;
}

.clock {
 width: 78%;
 margin: 0 auto;
 font-size: 40px;
 color: white;
 text-align: center;
 font-weight: 800;
 padding-top:20px; 
 height:80px;
}

.separator {
 font-size: 40px;
 color: white;
 float: left;
 margin-left: 10px;
 margin-right: 10px;
}

.separator2 {
 width: 10px;
 height: 100%;
 float: left;
}


.hours-wrapper {
 float: left;
}

.hours-text {
 font-size: 14px;
 font-weight: normal;
}


.minutes-wrapper {
 float: left;
}

.minutes-text {
 font-size: 14px;
 font-weight: normal;
}

.seconds-wrapper {
 float: left;
}

.seconds-text {
 font-size: 14px;
 font-weight: normal;
}

.AMPM-wrapper {
 float: left;
}

.AMPM-text {
 font-size: 14px;
 font-weight: normal;
}


/*======================================FOOTER=============================================*/

.footer-links {
 margin-bottom: 20px;
 margin-top: 20px;
}

.footer-links a {
 color: #3498DB;
 text-decoration: none;
}

#footer {
 font-size: 12px;
 padding-top: 30px;
 margin: 0 auto;
 text-align: center;
 color: #555;
}

#footer a{
 color: #3498DB;
 text-decoration: none;
}
For the demo you can download it , just click the "pay with tweet" button, and follow the instruction

Download for free if you pay with a Tweet!

This project created by the team of sevnteen sevn 

Posted on Tuesday, October 22, 2013 by Oki Prasastio

No comments

October 10, 2013


Now , I want to show you my simple project . It called jQuery Drop Down Slider Flat Style.

As you can see in that picture , The design is flat , simple , but elegant and easy to create
The main function is to slide down the content when you click the header of the content 
But i create it a little different , i create with the new trend of design , Flat Style

Here i give you the main code 


Javascript 


HTML 


<div id="box-wrapper">
 <div class="box-head">
  <div class="box-title">Click Me!</div>
  <div class="arrowimage on"></div>
 </div>
 <div class="box-content">
  <h1>Hello World!</h1>
  <div class="box-text">
 Lorem ipsum dolor sit amet, consectetur adipisicing elit, sed do eiusmod tempor incididunt ut labore et dolore magna aliqua. Ut enim ad minim veniam, quis nostrud exercitation ullamco laboris nisi ut aliquip ex ea commodo consequat. Duis aute irure dolor in reprehenderit in voluptate velit esse cillum dolore eu fugiat nulla pariatur. Excepteur sint occaecat cupidatat non proident, sunt in culpa qui officia deserunt mollit anim id est laborum.
  </div>
 </div>
</div>

HTML With Form 


<div id="box-wrapper">
 <div class="box-head">
  <div class="box-title">Click Me!</div>
  <div class="arrowimage on"></div>
 </div>
 <div class="box-content">
  <h1>Hello World!</h1>
  <div class="box-text">
    Lorem ipsum dolor sit amet, consectetur adipisicing elit, sed do eiusmod tempor incididunt ut labore et dolore magna aliqua. Ut enim ad minim veniam, quis nostrud exercitation ullamco laboris nisi ut aliquip ex ea commodo consequat.
  <form>
   <input type="text" class="inputform input-green" placeholder="GREEN">
   <input type="text" class="inputform input-red" placeholder="RED">
   <input type="text" class="inputform input-blue" placeholder="BLUE">

   <a href="#" class="a-button">Submit</a>
  </form>
 </div>
 </div>
</div>

CSS 


body {
 margin:0px;
 background-color: #fff;
 font-family: Helvetica, Arial, sans-serif;
}

#box-wrapper {
 width: 900px;
 margin: 0 auto;
 margin-top: 40px;
}

.box-head {
 position: relative;
 width: 100%;
 height: 50px;
 background-color: #1abc9c;
 cursor: pointer;
 z-index: 100;
 box-shadow: 0px 3px 0px 0px #179c82;
}

.box-title {
 color: #fff;
 padding: 13px;
 /*font-weight: 800;*/
 font-size: 20px;
 float: left;
}

.box-content {
 /*display: none;*/
 background-color: #eff0f2;
 height: 300px;
 box-shadow: 0px 3px 0px 0px #ccc;
}

.box-content h1 {
 color: #555;
 margin: 0px;
 text-align: center;
 padding-top: 40px;
 text-shadow: 1px 1px 1px #ffffff;
}

.box-text {
 margin: 0 auto;
 width: 90%;
 color: #6b6a63;
 padding-top: 20px;
 text-align: center;
 line-height: 25px;
 text-shadow: 1px 1px 1px #ffffff;
}

.arrowimage {
 background: url("../images/bttn-panah-bawah.png");
 float: right;
 height: 30px;
 width: 30px;
 margin: 10px;
 margin-right: 20px;
}

.on {
 background: url("../images/bttn-panah-atas.png");
}


/*======================================FORM=============================================*/

.box-text form {
 margin-top: 30px;
}

.inputform {
 border: 2px solid #bdc3c7;
 color: #34495e;
 font-size: 15px;
 padding: 8px 12px;
 -webkit-appearance: none;
 border-radius: 6px;
 -webkit-box-shadow: none;
 -moz-box-shadow: none;
 box-shadow: none;
}

.input-green:focus {
 border: 2px solid #179c82;
 outline:none;
}

.input-red:focus {
 border: 2px solid red;
 outline:none;
}

.input-blue:focus {
 border: 2px solid #3498DB;
 outline:none;
}

.a-button {
 border-radius: 6px;
 -moz-border-radius: 6px;
 position: relative;
 padding: 10px 25px;
 background-color: #3498DB;
 cursor: pointer;
 z-index: 100;
 color: #fff;
 /*font-weight: 800;*/
 font-size: 16px;
 text-decoration: none;
 text-shadow: none;
}
For the demo you can download it , just click the "pay with tweet" button, and follow the instruction

Download for free if you pay with a Tweet!

This project created by the team of
sevnteen sevn 


Posted on Thursday, October 10, 2013 by Oki Prasastio

2 comments

October 1, 2013

Jquery Progress Loader Flat

Di sini saya akan share salah satu karya saya, walaupun sederhana namun barangkali bisa bermanfaat bagi teman teman di sini saya akan share tentang Jquery simple progress loader bertemakan flat style , Langkah untuk membuat nya sederhana script script inti dari Fungsi ini hanyalah potongan javascript sederhana yaitu seperti di bawah ini : 


Penjelasan :

maksud dari
$( "#runbutton-two" ).click(function(){}
#runbutton-two adalah id div element yang menjadi tombol untuk menjalankan loader
$(document).ready(function(){}
Ini artinya saat dokumen di load , loader akan berjalan secara otomatis

disini saya akan memberikan salah satu div yang saya jadikan sebagai loadernya

<br />
<div class="skill-box">
<div class="skill-title">
<center>
SKILLS</center>
</div>
<div class="skill-desc-first">
Web development</div>
<div class="grey-bar">
<div class="progress prog-wdev-two">
</div>
</div>
<div class="skill-desc">
Web Design</div>
<div class="grey-bar">
<div class="progress prog-wd-two">
</div>
</div>
<div class="skill-desc">
Graphic Design</div>
<div class="grey-bar">
<div class="progress prog-gd-two">
</div>
</div>
<div class="runbutton" id="runbutton-two">
RUN IT!</div>
</div>


Penjelasan :

potongan script diatas adalah script untuk menjalankan loader secara manual , jadi saat div ber-id
runbutton-two
di klik maka
$( "#runbutton-two" ).click(function(){)}
akan berjalan dan akan menjalankan
$(".prog-wdev-two").animate({"width": "80%"}, 5000);
yang berarti div ber-class
prog-wdev-to
akan di jalankan/animasikan menggunakan fungsi animate , fungsi animate sendiri adalah membuat animasi dari width 0% menjadi 80% , dan arti dari 5000 yaitu animasi akan berjalan selama 5000/1000 detik atau sama dengan 5 detik
untuk css inti dari loader ini adalah sebagai berikut


.skill-box {
	float: left;
	width: 360px;
	/*height: 250px;*/
	background-color: #fff;
	margin-left: 40px;
	margin-top: 20px;
	padding-bottom: 30px;
	overflow: auto;
}

.grey-bar{
	width: 340px;
	margin-left: 10px;
	background-color: #ebebeb;
	height: 5px;
	position: relative;
}

.progress {
	width: 0px;
	height: 5px;
	background-color: #1AB0D7;
	position: relative;
	z-index: 10;
}


.progress-red {
	width: 0px;
	height: 5px;
	background-color: red;
	position: relative;
	z-index: 10;
}

.progress-orange {
	width: 0px;
	height: 5px;
	background-color: orange;
	position: relative;
	z-index: 10;
}


.progress-green {
	width: 0px;
	height: 5px;
	background-color: green;
	position: relative;
	z-index: 10;
}


.skill-title {
	color: #afafaf;
	font-family: "ProximaNovaRegular", 'Helvetica Neue', Arial, Helvetica, sans-serif;
	font-size: 18px;
	margin: 0 auto;
	padding-top: 20px;
	/*padding-top: 15px;*/
	/*padding-bottom: 15px;*/
	padding-bottom: 30px;
}

.skill-desc {
	font-family: "ProximaNovaRegular", 'Helvetica Neue', Arial, Helvetica, sans-serif;
	font-size: 14px;
	margin: 0 auto;
	padding-top: 20px;
	padding-bottom: 10px;
	margin-left: 10px;
	color: #afafaf;
}

.skill-desc-first {
	font-family: "ProximaNovaRegular", 'Helvetica Neue', Arial, Helvetica, sans-serif;
	font-size: 14px;
	margin: 0 auto;
	padding-top: 0px;
	padding-bottom: 10px;
	margin-left: 10px;
	color: #afafaf;
}

.runbutton {
	color: white;
	font-family: "ProximaNovaRegular", 'Helvetica Neue', Arial, Helvetica, sans-serif;
	font-size: 16px;
	text-align: center;
	background-color: #1AB0D7;
	padding: 10px;
	margin: 0 auto;
	width: 100px;
	margin-top: 20px;
	border-radius: 3px;
	-moz-border-radius; 3px;
	cursor: pointer;
}


untuk lebih jelasnya teman teman bisa mendownload contoh yang saya berikan , beserta demo page nya secara free Klik tombol di bawah , ikuti langkahnya

Download for free if you pay with a Tweet!

Projek ini di buat oleh tim sevnteen sevn 


Posted on Tuesday, October 01, 2013 by Oki Prasastio

No comments

September 22, 2013

Codeigniter merupakan open source aplikasi framework PHP yang berfungsi untuk memudahkan para programmer PHP dalam membuat program nya .

dan saat anda membuat suatu program web , tentu fungsi login / logout sering di pakai , bahkan sangat wajib dimiliki terutama untuk web yang memang memerlukan autentikasi user .

Disini saya akan membahas cara termudah bagaimana anda memasang fungsi login / logout pada framework CodeIgniter. 

Ikuti langkah langkah berikut 


Persiapan

  • Download Codeigniter terlebih dahulu disini saya akan memakai versi 2.1.4.
  • Pastikan semua fungsi web server apache/PHP/MySql berjalan baik.

Menginstall Codeigniter

untuk menginstall codeigniter anda cukup mengekstrak file zip file Codeigniter yang tadi anda download ke direktori htdocs (xampp) atau pada folder www (wamp).

Membuat database

buat terlebih dahulu database di phpmyadmin disini saya mencontohkan membuat database dengan menggunakan nama db_user lalu isikan table dengan struktur sebagai berikut.

CREATE TABLE `users` (
 `id` tinyint(4) NOT NULL AUTO_INCREMENT,
 `username` varchar(10) NOT NULL,
 `password` varchar(100) NOT NULL,
 PRIMARY KEY (`id`)
) ENGINE=MyISAM DEFAULT CHARSET=latin1 AUTO_INCREMENT=1 ;

lalu tambahkan data pada tabel users dengan struktur data sebagai berikut.

insert into users (username, password) values ('admin', MD5('rahasia'));

Mengkonfigurasi database

Akses database

Update file application/config/database.php di folder codeigniter anda , lalu edit baris ini.

$db['default']['hostname'] = 'localhost';
$db['default']['username'] = 'root';
$db['default']['password'] = '';
$db['default']['database'] = 'db_user';

Default Controller 

Kita harus memberi tahu Codeigniter untuk mengarahkan kita ke halaman login , update file application/config/routes.php di folder codeigniter anda dengan nama controller anda . disini saya akan membuat controller dengan nama login.
$route['default_controller'] = "login";

Default Libraries 

Dalam file application/config/autoload.php anda dapat mengkonfigurasi library default yang anda akan pakai di semua controller anda , untuk saat ini , saya akan menggunakan database dan session library , yang digunakan untuk meng-handle session user dan juga URL Helper untuk pemrosesan link.

$autoload['libraries'] = array('database','session');
$autoload['helper'] = array('url');

Encryption Key

Saat anda menggunakan library session, anda harus set encryption key pada file application/config/config.php.
$config['encryption_key'] = 'REALLY_LONG_NUMBER';

Script

ini adalah kumpulan script Controller, View dan Model yang akan kita gunakan untuk membuat login berfungsi.

User Model (application/models/user.php)

<?php
Class User extends CI_Model
{
 function login($username, $password)
 {
   $this -> db -> select('id, username, password');
   $this -> db -> from('users');
   $this -> db -> where('username', $username);
   $this -> db -> where('password', MD5($password));
   $this -> db -> limit(1);

   $query = $this -> db -> get();

   if($query -> num_rows() == 1)
   {
     return $query->result();
   }
   else
   {
     return false;
   }
 }
}
?>


Login Controller (application/controllers/login.php)

<?php if ( ! defined('BASEPATH')) exit('No direct script access allowed');

class Login extends CI_Controller {

 function __construct()
 {
   parent::__construct();
 }

 function index()
 {
   if($this->session->userdata('logged_in'))
   {
     redirect('home', 'refresh');
   }
   else 
   {
      $this->load->helper(array('form'));
      $this->load->view('login_view');
   }
 }

}

?>


Login View (application/views/login_view.php)

<!DOCTYPE html PUBLIC "-//W3C//DTD XHTML 1.0 Transitional//EN" "http://www.w3.org/TR/xhtml1/DTD/xhtml1-transitional.dtd">
<html xmlns="http://www.w3.org/1999/xhtml">
 <head>
   <title>Simple Login menggunakan CodeIgniter</title>
 </head>
 <body>
   <h1>Simple Login menggunakan CodeIgniter</h1>
   <?php echo validation_errors(); ?>
   <?php echo form_open('verifylogin'); ?>
     <label for="username">Username:</label>
     <input type="text" size="20" id="username" name="username"/>
     <br/>
     <label for="password">Password:</label>
     <input type="password" size="20" id="passowrd" name="password"/>
     <br/>
     <input type="submit" value="Login"/>
   </form>
 </body>
</html>


VerifyLogin Controller (application/controllers/verifylogin.php)

Controller ini digunakan untuk membuat validasi terhadap database
 
<?php if ( ! defined('BASEPATH')) exit('No direct script access allowed');

class VerifyLogin extends CI_Controller {

 function __construct()
 {
   parent::__construct();
   $this->load->model('user','',TRUE);
 }

 function index()
 {
   //Aksi untuk melakukan validasi
   $this->load->library('form_validation');

   $this->form_validation->set_rules('username', 'Username', 'trim|required|xss_clean');
   $this->form_validation->set_rules('password', 'Password', 'trim|required|xss_clean|callback_check_database');

   if($this->form_validation->run() == FALSE)
   {
     //Jika validasi gagal user akan diarahkan kembali ke halaman login
     $this->load->view('login_view');
   }
   else
   {
     //Jika berhasil user akan di arahkan ke private area 
     redirect('home', 'refresh');
   }

 }

 function check_database($password)
 {
   //validasi field terhadap database 
   $username = $this->input->post('username');

   //query ke database
   $result = $this->user->login($username, $password);

   if($result)
   {
     $sess_array = array();
     foreach($result as $row)
     {
       $sess_array = array(
         'id' => $row->id,
         'username' => $row->username
       );
       $this->session->set_userdata('logged_in', $sess_array);
     }
     return TRUE;
   }
   else
   {
     $this->form_validation->set_message('check_database', 'Invalid username or password');
     return false;
   }
 }
}
?>


Home Controller (application/controllers/home.php)

Ini adalah halaman private, hanya user yang telah login yang dapat masuk
<?php if ( ! defined('BASEPATH')) exit('No direct script access allowed');
session_start(); //Memanggil fungsi session Codeigniter
class Home extends CI_Controller {

 function __construct()
 {
   parent::__construct();
 }

 function index()
 {
   if($this->session->userdata('logged_in'))
   {
     $session_data = $this->session->userdata('logged_in');
     $data['username'] = $session_data['username'];
     $this->load->view('home_view', $data);
   }
   else
   {
     //Jika tidak ada session di kembalikan ke halaman login
     redirect('login', 'refresh');
   }
 }

 function logout()
 {
   $this->session->unset_userdata('logged_in');
   session_destroy();
   redirect('home', 'refresh');
 }

}

?>


Home Page View (application/views/home_view.php)

<!DOCTYPE html PUBLIC "-//W3C//DTD XHTML 1.0 Transitional//EN" "http://www.w3.org/TR/xhtml1/DTD/xhtml1-transitional.dtd">
<html xmlns="http://www.w3.org/1999/xhtml">
 <head>
   <title>Simple Login menggunakan CodeIgniter - Private Area</title>
 </head>
 <body>
   <h1>Home</h1>
   <h2>Selamat datang<?php echo $username; ?>!</h2>
   <a href="home/logout">Logout</a>
 </body>
</html>


Tutorial ini sebenarnya mudah untuk di pelajari jika anda benar benar mengikuti langkah langkah yang saya tulis . jika anda kesulitan anda bisa mendownload file contoh yang sudah saya buat disini.
Cara download klik tab file lalu klik Download

Good Luck! , semoga berhasil
Tutorial By Suave Digital Team


Tag: Creative Web Development , design graphic company , php development indonesia , suave digital , web development , web development bandung , web development indonesia , Php developer indonesia , php developer bandung indonesia , php developer cimahi indonesia , web development indonesia , web design indonesia , web design cimahi , web development cimahi , web development and graphic design company ,

Posted on Sunday, September 22, 2013 by Oki Prasastio

16 comments

November 26, 2010

Anda mungkin pernah atau mungkin kini memiliki sebuah file file pribadi atau file penting dan mungkin anda ingin menembunyikannya agar file itu tidak dilihat orang lain berikut tips jitu untu menembunyikan file dan pasti tidak akan diketahui orang lain bahkan seorang programmer sekalipun

-----------------------------------------------------

1. Langkah pertama :

buka windows explorer

klik kanan di start>explore(open windows explorer untuk windows 7 dan vista)

-------------------

2. Buka file anda:


------------------

3. Langkah ketiga

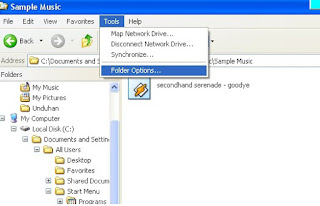
Klik tab tools lalu klik folder options


------------------

4. Langkah keempat

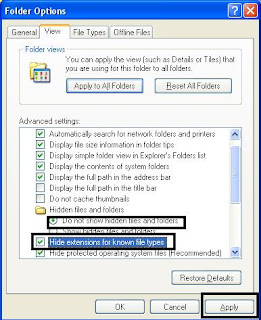
Buka tab view lalu klik lingkaran pada teks "show hidden files and folders"
JANGAN contreng kotak pada teks "hide extensions for knowns file types"


------------------

5. langkah kelima

buka lagi file anda lalu ubahlah 3 huruf terakhir dibelakang titik

contoh : dari .wma menjadi .dll


------------------

6. Langkah keenam

rubahlah 3 huruf tersebut menjadi .dll (direkomendasikan / sebenarnya dapat diubah sesuai keinginan anda) lalu klik oke jika ada pesan


------------------
7. langkah ketujuh

klik kanan pada file klik properties lalu contreng kata hidden

contoh :


lalu klik "apply"


-------------------
8. File anda berhasil disembunyikan


CARA MENGEMBALIKAN FILE KEMBALI


caanya cukup buka windows explorer start>explore lalu klik tab tools lalu klik folder options


lalu buka tab view lalu klik lingkaran pada teks "don't show hidden files and folders"
contreng kotak pada teks "hide extensions for knowns file types"


lalu buka file anda kembali (warna icon agak samar) lalu klik kanan pada file lalu properties
dan jangan contreng tanda "hidden" lalu apply (icon file normal kembali)
rubah lagi tiga huruf dibelakang titik seperti yabg tadi sudah dijelaskan menjadi ke huruf semula
contoh : .dll menjadi .wma


-----------------------------
FILE ANDA KEMBALI LAGI

Posted on Friday, November 26, 2010 by Oki Prasastio

1 comment

November 17, 2010


VLC media player adalah player multimedia yang sangat portabel untuk audio berbagai format video serta DVD, VCD, dan berbagai protokol streaming tanpa codec eksternal atau program.

Hal ini juga dapat digunakan sebagai server untuk streaming dalam unicast atau multicast di IPv4 atau IPv6 pada jaringan bandwidth tinggi.

VLC bisa bermain:
MPEG-1, MPEG-2 dan MPEG-4 / DivX file dari hard disk, drive CD-ROM, dan sebagainya
DVD, VCD, dan CD Audio
Dari kartu satelit (DVB-S)
Beberapa jenis jaringan stream: UDP / RTP Unicast, UDP / RTP Multicast, HTTP, RTSP, MMS, dll
Dari kartu akuisisi atau encoding (pada GNU / Linux dan Windows saja)


Klik tombol download dibawah untuk mendownload file ini


DOWNLOAD


Posted on Wednesday, November 17, 2010 by Oki Prasastio

No comments